How To Install Dishwasher - Video
Issue
Learn the requirements for correct installation of Westinghouse dishwasher
Applies to
- Dishwasher
Solution
Positioning the machine
When considering the location for the dishwasher, ensure that there is adequate space to enable loading and unloading of the dishes.
Do not put your machine in any location where the ambient temperature can fall below 5°C.
Before positioning, take the machine out of its packaging by following the warnings located on the package.
Position the machine close to a water tap and drain. You need to position your machine, taking into consideration that its connections will not be altered once they are made.
Do not grip the machine by its door or panel in order to move it.
Take care to leave a certain clearance from all sides of the machine so that you can comfortably move it back and forth during cleaning.
Make sure that the water inlet and outlet hoses do not get squeezed while positioning the machine. Also, make sure that the machine does not stand on the electrical cable. Adjust the machine’s feet so that it is level and stable. Proper positioning of the machine ensures problem-free opening and closing of its door.
If the door of your machine does not close properly, check if the machine is stable on the floor; if not, adjust the feet and ensure it is level and stable.
Fitting the Machine Undercounter
If you wish to fit your machine undercounter, check whether you have sufficient space under your countertop and whether the wiring-plumbing is suitable to do so.
To ensure the stability of the dishwasher for an under-bench installation, if the under-bench dimension is greater than 820mm, any gap between the dishwasher and the underside of the benchtop should be bridged with a packing piece. This may be achieved by wedging a piece of timber between the dishwasher and the benchtop as shown.
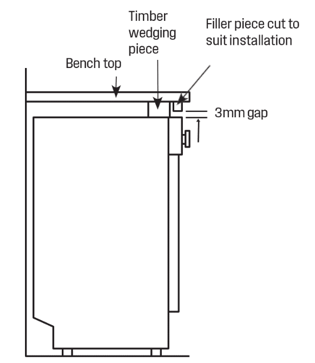
Adjust the machine feet according to the slope of the floor.
Fit your machine by pushing it undercounter without letting the hoses get crushed or bent.
Ensure the opening for the dishwasher is according to the following dimensions.
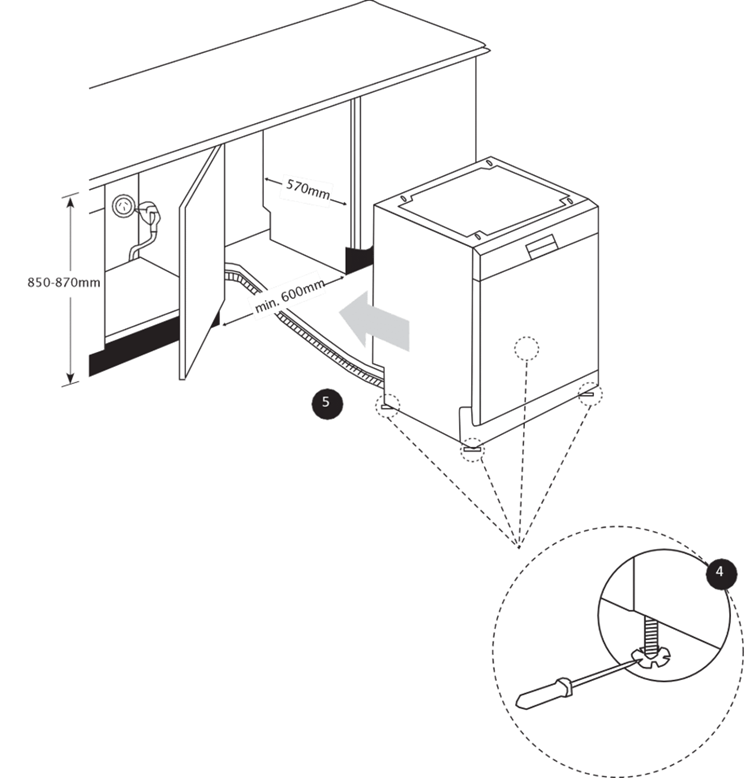
Water Connection
Ensure that the indoor plumbing is suitable for installing a dishwasher and complies with AS/NZS 3500.1.
It is recommended that a filter is fitted to the water supply to avoid any damage to the machine due to contamination (sand, clay, rust etc) that could possibly be carried through the main’s water supply or the indoor plumbing, and to avoid problems of staining and formation of deposits after washing.
Water Inlet Hose
Do not use the water inlet hose of your old machine, you must use the new water inlet hose supplied with your machine.
Before connecting the water inlet hose to the water tap, ensure clean water is flowing from the tap before making the connection.
Connect the water inlet hose directly to the water inlet tap.
The pressure supplied by the tap should be at a minimum of 0.03 MPa and at a maximum of 1 MPa. If the water pressure is above 1 MPa, a pressure-relief valve should be installed.
A water tempering valve is required if the water temperature is over 60°C.
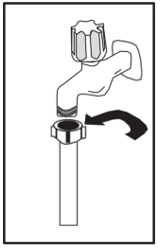
Note: Only turn the locking nut to secure the hose - Do not turn the hose
After the connections are made, the tap should be turned on fully and checked for water tightness. For the safety of your machine, make sure to always turn off the water inlet tap after each wash program is finished.
- The first time you use the appliance, make sure that there is no leakage.
- The water inlet hose has a safety valve and a sheath with an inner mains cable.
Note: Aquastop inlet hose has components using 240V. Do not cut the aquastop inlet hose. Do not let it get folded, twisted, kinked or crushed.
To pass the safety valve through the kitchen cabinets, an opening of at least 45mm x 90mm is needed.
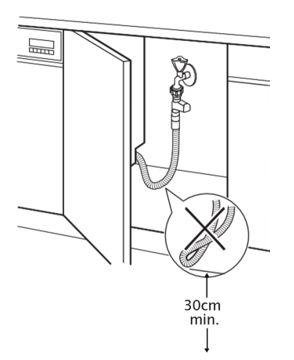
Allow at least 30cm below inlet hose connection point to ensure hose is not damaged.
Water Drain Hose
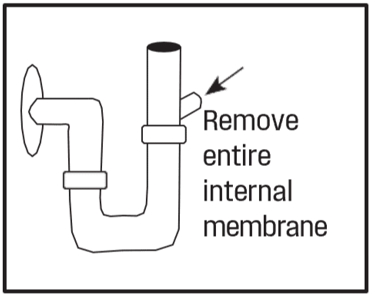
If you connect the water drain hose to a trap spigot under the sink, remove the plastic membrane. If you do not remove the entire membrane, remaining food can cause a blockage in the drain hose spigot. Ensure a hose clamp is used to secure the hose to the spigot.
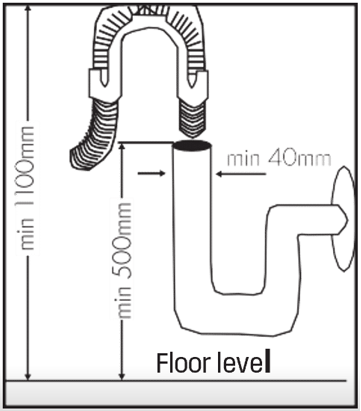
The water drain hose can be connected either directly to the water drain hole or to the sink outlet spigot. Using a hose hook (if available), the water can be drained directly into the sink by positioning the hose hook over the edge of the sink.
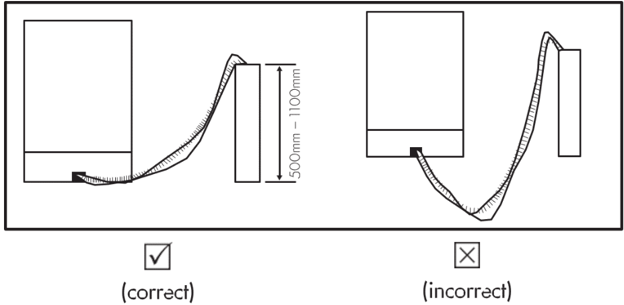
This connection should be at a minimum of 50 cm and at a maximum of 110 cm above the base of the dishwasher.
Maximum drain hose length is 4m. Longer hose length will prevent correct draining, and result in poor wash performance.
Electrical Connection
The plug of your machine should be connected to an earthed outlet that supplies suitable voltage and current. If there is no earthing installation, have a competent electrician carry out an earthing installation. In case of usage without earthing installed, our company will not be responsible for any loss of usage that might occur.
The indoor fuse current value should be 10-16 A.
Your machine is designed for 220-240 V. The machine should not be plugged in during installation.
Always use the moulded plug supplied with your machine.
Running in low voltage will cause a decline in washing quality.
The machine’s electrical cable should be replaced by an authorised service or an authorised electrician only. Failure to do so may lead to accidents.
For safety purposes, always make sure to disconnect the plug when a wash program is finished.
In order not to cause an electric shock, do not unplug when your hands are wet.
When disconnecting your machine from the mains supply, always pull from the plug. Never pull the cord itself.
Was this article helpful?
Related Articles
- Discoloration of silver or aluminium items after washing in the dishwasher
- Dishwasher drain hose extension
- Dishwasher displays E - Error Code number – Troubleshoot
- How to stack your dishwasher - (Video)
- Lights flashing on the display – wash cycle will not start
- Dishwasher displays Error E1
- Dishwasher leaking from appliance door
- Dishwasher displays F Error Code number– Troubleshoot
- Dishwasher - Why should I use Rinse Aid?
- Internal light in the dishwasher is not working
Related Articles
- Discoloration of silver or aluminium items after washing in the dishwasher
- Dishwasher drain hose extension
- Dishwasher displays E - Error Code number – Troubleshoot
- How to stack your dishwasher - (Video)
- Lights flashing on the display – wash cycle will not start
- Dishwasher displays Error E1
- Dishwasher leaking from appliance door
- Dishwasher displays F Error Code number– Troubleshoot
- Dishwasher - Why should I use Rinse Aid?
- Internal light in the dishwasher is not working